Tuesday, July 31, 2018

How to install iOS 12 Beta 5 on iPhone or iPad

How to install iOS 12 Beta 5 on iPhone or iPad
Apple releases iOS 12 beta 5 for registered developers for download for iPhone, iPad and iPod touch.


The 5th Beta of iOS 12 consists of many changes and updates that are listed below:
New Apple News Button, Use as Wallpaper Button & Copy iCloud Link Button
New Sound in FaceTime
New icon for media types in Photos app
Updates Stocks Widget
New Search by Lyrics box in Music App
And More
The iOS 12 developer beta 5 is currently available for download registered developer only. The registered developer can install this beta from the developer account or can directly update via OTA mechanism if they have already installed the previous beta from Settings >> General >> Software Update.Sponsor Ads:
Gihosoft Free iPhone Data Recovery is a professional iPhone Data Recovery software to get back all your lost text message, photo, video, call history, note, contact and more from iPhone/iPad/iPod Touch. It offers a full solution to recover your lost data in different tough situations. Besides recovering data directly from iPhone, iPad and iPod touch, it also allows you to recover data from iCloud and iTunes backup files.
iPhone backup unlocker:Recover iTunes Backup Password.
iPhone backup extractor free:The best iPhone Backup Extractor software to extract photos, text messages, contacts, voice memos, note, WhatsApp, Viber and etc from iPhone/iPad backup.


What’s new in iOS 12


If you’re not a developer then you can join the Apple Developer Program, which includes a signup fee of $100.


But is it possible to get the developer beta 5 of iOS 12 even without developer account?

Of Course Yes! You can easily install iOS 12 beta 5 profile on your iPhone, iPad and iPod Touch without Developer Account or Computer but we don’t recommend and try it at your own risk. There may be many bugs and issues in beta so better to wait for the final public version of iOS 12.


Simply follow this below steps how you can install and update to iOS 12 beta 5 right from your iPhone or iPad. For this, you don’t need developer account or any computer and it’s super easy.


Download iOS 12 beta 5 without developer account


Step 1: Launch Safari on your iPhone/iPad, and enter this URL.


Step 2: It will then redirect to iOS 12 beta profile management page. Tap to Slow download (Free) to install the developer profile on your device.


Step 3: After the profile is installed, you will be asked to restart your device. Tap on Restart.


How to install iOS 12 beta 5 without developer account


Step 4: Now Go to Settings >> General >> Software Update. Tap Download and Install iOS 12 beta on your iPhone/iPad as normal like you update via OTA.


Step 5: Enter your passcode. Agree on the terms & Condition.


Step 6: Seat back and relax for sometimes until it completes downloading. Next Tap on install to get iOS 12 on your iPhone or iPad.


That’s it. You have now iOS 12 beta 5 installed on your iPhone/iPad without a developer account.


iOS 12 Compatible devices


So this is all guys! Hope you find it useful and don’t forget to share it with your friends too.


If you lost videos from iOS Camerall Roll which are nowhere to download again, you can use Gihosoft iPhone Data Recovery to get back deleted videos from iOS device including iPhone, iPad and iPod Touch.
Jihosoft iPhone Backup Extractor Extract and recover all types of data from iPhone backup files, such as camera roll photos, videos, SMS, contacts, reminders, WhatsApp, and etc.
Gihosoft Android data recovery Free is a super awesome software specialized in Android file recovery.

Monday, July 30, 2018

How to Turn On Mono audio on iPhone X, iPhone 8/8 Plus, iPhone 7/7 Plus, 6, 6 plus – other iOS 12 and Earlier devices 2019

Turn On Mono audio on iPhone X, iPhone 8/8 Plus, iPhone 7/7 Plus, 6, 6 plus – other iOS 12 and Earlier devices 2019
How to Turn On Mono audio on iPhone X, iPhone 8/8 Plus, iPhone 7/7 Plus, 6, 6 plus – other iOS 12 and Earlier devices 2019
Turn On Mono audio on iPhone X, iPhone 8/8 Plus, iPhone 7/7 Plus, 6, 6 plus – other iOS 12 and Earlier devices

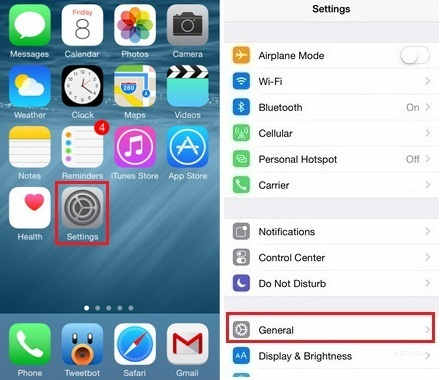
Step 1.

Launch Settings Appyourrom you iPhone home screen

Step 2.

Tap On, General

Step 3.

Select, Accessibility

Step 4.

Tap, Turn Mono Audio ON, under the hearing section.


How to disable/ Turn on Mono Audio on iPhone
Get here tip about how to Disable or Turn off Mono Audio on iPhone iPad or iPod touch. You can do it beneath given way.

Settings >> General >> Accessibility >> Turn Mono Audio Off
You can also inform us without hesitate, if have issue or error concern to this tip turn off or turn on mono audio. kindly keep in touch with us to get a daily update of our site.iPhone backup unlocker:Recover iTunes Backup Password.

iPhone backup extractor free:The best iPhone Backup Extractor software to extract photos, text messages, contacts, voice memos, note, WhatsApp, Viber and etc from iPhone/iPad backup.

Wednesday, July 25, 2018

How to Reset Frozen iPhone after iOS 12 Update without iTunes

How to Reset Frozen iPhone after iOS 12 Update without iTunes

Force Reboot the iPhone Frozen after Updating to iOS 12

When we speak of reset frozen iPhone without iTunes, the most frequently used option that comes in mind is soft reset/force restarting the iPhone. This usually resolves most iOS issues that occur due to different reasons such as iOS 12 update, unstable and buggy apps, etc.

Here is how to force restart an iPhone 6/older versions –


Tap and hold down the 'Sleep/Wake' and 'Home' keys together. Wait until the Apple logo surfaces on screen.


Un-hold both the keys as soon as you see the Apple logo. Let the iPhone start on its own afterwards.


For iPhone 7/7 Plus –


Press and hold the Sleep/Wake' and 'Volume Down' keys simultaneously. Lift your fingers from the keys only after seeing the Apple logo on your iPhone screen. Your iPhone will then be rebooted.


If you have an iPhone 8/iPhone X with you –


Click and release the 'Volume Up' key quickly.


Repeat the same procedure with the 'Volume Down' key as well.


You need to hold down the 'Power' key afterwards, till the Apple logo is visible on screen. Give some time to allow the iPhone restart.If you lost videos from iOS Camerall Roll which are nowhere to download again, you can use Gihosoft iPhone Data Recovery to get back deleted videos from iOS device including iPhone, iPad and iPod Touch.


Jihosoft iPhone Backup Extractor Extract and recover all types of data from iPhone backup files, such as camera roll photos, videos, SMS, contacts, reminders, WhatsApp, and etc.


Gihosoft Android data recovery Free is a super awesome software specialized in Android file recovery. With this program, you are able to recover deleted photos, music, videos, messages, contacts, call logs, WhatsApp messages, Viber chat history and more from Samsung, Huawei, LG, HTC, Motorola, Google, Oneplus, Sony, Lenovo, ZTE and other Android devices directly. Meanwhile, this Android data recovery software is available for both Windows and Mac platforms.


Tuesday, July 24, 2018

How to Fix iPhone Battery Percentage Stuck?


How to Fix iPhone Battery Percentage Stuck?
1. Turn Off and Turn On Set Automatically

When your iPhone battery percentage stuck at a particular figure and it doesn't buzz at all, you can try turning on and off the 'Set Automatically' option in Date & Time feature to fix the issue. Usually for iPhone 6S/6S Plus, manually altering the time zone when you travel is resulting in iPhone battery percentage stuck problem. So, how about a quick fix at our end, while Apple settles it with a new update?

Here is how –


Connect your iPhone to a stable Wi-Fi network and browse 'Settings'.


Go to 'General' and then 'Date & Time'.


Now, toggle the 'Set Automatically' switch off and then on.


Now, you need to force restart your iPhone. When your device is successfully restarted, you can see that the annoying battery stuck problem might have been resolved.


2. Turn Off Battery Percentage and Then Turn It Back On

The second solution when your iPhone battery percentage stuck is turning off and on the battery percentage. This process though fixes this weird problem temporarily; you need to toggle the indicator off and on. Here comes how to fix iPhone battery percentage stuck using this method.


On your iPhone, go to 'Settings' and then scroll down a bit to select the 'Battery' tab.


Now, the next screen will load all the battery related settings. You are then required to look for 'Battery Percentage' toggle switch to turn it 'OFF', wait for a few seconds and then back to 'ON'. If it was 'OFF' already then simply toggle it 'ON'.


Quit 'Settings' now and reboot your device normally. Now, your iPhone battery percentage stuck trouble might get resolved.


The above mentioned processes may fix this troublesome situation temporarily and show the battery indicator properly. But, if the issue is related to iOS update, then you might need to wait until the next update comes and this bug is taken care of.
3. Restore iPhone using iTunes (Data Loss)

Most of the times, various iPhone and iOS issues get resolved by restoring iPhone with iTunes. Though, the process results in complete data loss from the device. In this section, we will try fixing iPhone battery percentage stuck problem by restoring device with iTunes.


Launch iTunes on your pre-trusted computer.


Get a lightning cable and connect your iPhone to the computer. Follow the onscreen instructions if prompted for trusting the computer.


Tap on your iPhone (device icon at the top) in iTunes interface and hit 'Summary'.


Click on 'Restore iPhone…' and confirm by tapping 'Restore'.


Once the iPhone has been restored to its factory settings, possibly the iPhone battery percentage stuck issue gets resolved.If you lost videos from iOS Camerall Roll which are nowhere to download again, you can use Gihosoft iPhone Data Recovery to get back deleted videos from iOS device including iPhone, iPad and iPod Touch.

Jihosoft iPhone Backup Extractor Extract and recover all types of data from iPhone backup files, such as camera roll photos, videos, SMS, contacts, reminders, WhatsApp, and etc.

Gihosoft Android data recovery Free is a super awesome software specialized in Android file recovery. With this program, you are able to recover deleted photos, music, videos, messages, contacts, call logs, WhatsApp messages, Viber chat history and more from Samsung, Huawei, LG, HTC, Motorola, Google, Oneplus, Sony, Lenovo, ZTE and other Android devices directly. Meanwhile, this Android data recovery software is available for both Windows and Mac platforms.


Monday, July 23, 2018

Download leaked Apple Store-exclusive iPad Pro 5K wallpapers


Download leaked Apple Store-exclusive iPad Pro 5K wallpapers
APPLE STORE-EXCLUSIVE WALLPAPERS LEAKED


Apple adds exclusive wallpapers to its devices specifically for Apple Stores. Unfortunately, these wallpapers are private probably due to licensing reasons and we only get a handful of stock pictures.


Thankfully enough, Reddit user “ajsayshello” was able to his hands on the Apple Store-exclusive wallpapers.


He used AirDrop to transfer all the pictures from an iPad Pro to his own device and was kind enough to upload them online.


The original download link on WeTransfer is already offline so we uploaded this to our private storage (link below), which will stay up forever.


lternatively, you can download each wallpaper individually from this link except for a few missing pictures. This will save you the hassle of unzipping the bulky archive on-device.


But remember, Imgur compresses images so the quality will slightly be lower than the original images. The original resolution of the images is 5464×4096 whereas Imgur’s images have a resolution of 4918×3686.
DOWNLOAD IPAD PRO 5K WALLPAPERS


ZIP archive (26 pictures)
HOW TO SET WALLPAPERS


Download the ZIP archive on your device using the link above. Unzip it using the Documents by Readdle or ZipApp from the App Store.


Open the stock Settings app, go to the Wallpaper section and tap “Choose a New Wallpaper”.


Select the desired image from your camera roll.


The wallpaper collection features some great wallpapers, some not-so-great wallpapers but there’s something for everyone. The resolution is a bit too big for the native iPhone resolution but you can crop them and use it.


Since these files have the 5K resolution, you can easily use them with your desktop (Windows or macOS).


Sponsor Ads:
Gihosoft Free iPhone Data Recovery is a professional iPhone Data Recovery software to get back all your lost text message, photo, video, call history, note, contact and more from iPhone/iPad/iPod Touch. It offers a full solution to recover your lost data in different tough situations. Besides recovering data directly from iPhone, iPad and iPod touch, it also allows you to recover data from iCloud and iTunes backup files.

Sponsor ads:Offline Music Apps for iPhone

Must Read:If you lost data after you updated to a new iPhone, you can always use Gihosoft iPhone Data Recovery to get the data back from the old iPhone or backup.
Gihosoft Free iPhone Data Recovery:iphonerecovery.com
If you use android phones, please choose Gihosoft Android Data Recovery

Monday, July 16, 2018

Set Up iCloud Photo Sharing on iPhone, iPad, Mac, or Windows 2019 Guide


iPad, Mac, or Windows PC


Quick access:


How to Get Into iCloud Photo Sharing on iPhone and iPad


How to Set Up iCloud Photo Sharing on your Mac


How to Enable iCloud Photo Sharing on your Windows PC


What are the requirements to use iCloud Photo Sharing? As it uses the iCloud account, you and all the people you wish to invite need to have it. Apple offers up to 5GB of free iCloud storage. If your file size exceeds the basic offering, you will have to upgrade the plan.


What about those who don’t have iCloud account? Well, with iOS 12 and macOS Mojave, Apple lets you share your photo album even with those who don’t have iCloud account. Besides, you can also share specific photos using the expiring link with anyone from your iPhone running iOS 12. Do note that these new methods don’t offer the same level of privacy.
The File Formats that Support iCloud Photo Sharing


iCloud Photo Sharing is compatible with multiple file types including HEIF, JPEG, RAW, PNG, GIF, TIFF, and MP4. It also has the support for slo-mo, time-lapse, and Live Photos.


Your shared images (captured by point-and-shoot cameras, SLR cameras, or iOS devices) feature 2048 pixels on the long edge. Panoramic photos are up to 5400 pixels wide.


iCloud Photo Sharing is compatible with HEVC, MP4, QuickTime video file types, and H.264 and MPEG-4 Video file formats.


The shared videos can be up to fifteen minutes in length. They are delivered at up to 720p resolution. Besides, your GIFs need to be 100MB or smaller.


Make Sure:


Ensure that you have enabled iCloud on all of your devices.


Be sure all of your devices are using the same iCloud account.


Make sure your PC is running Windows 7 or later. Besides, ensure that you have already downloaded iCloud for Windows if you wish to enable this feature on your PC.
How to Get Into iCloud Photo Sharing on iPhone and iPad


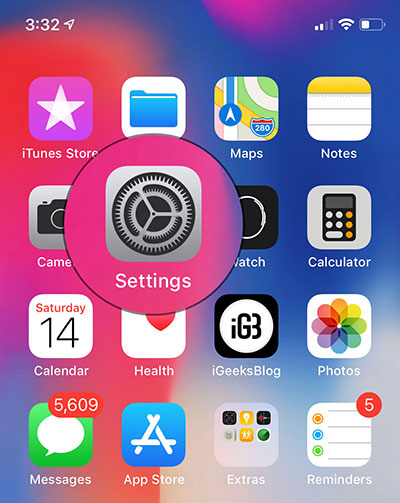
Step #1. Launch the Settings app on your iOS device.


Step #2. Now, tap on Photos.


Sponsored Links


Step #3. Turn on the switch next to iCloud Photo Sharing.


Note: In iOS 12, you need to turn on the switch next to Shared Albums. Settings → Photos → Shared Albums.


That’s it! You have enabled this feature on your iOS device.


If you ever wished to turn it off, follow the same steps mentioned above and turn off the switch in the end.If you accidentally deleted or lost videos on iPhone, first please check on the Recently Deleted folder. Alternatively, you can use the professional tool Gihosoft iPhone Recovery to recover deleted iPhone videos from Camera Roll or some apps.


How to Set Up iCloud Photo Sharing on your Mac


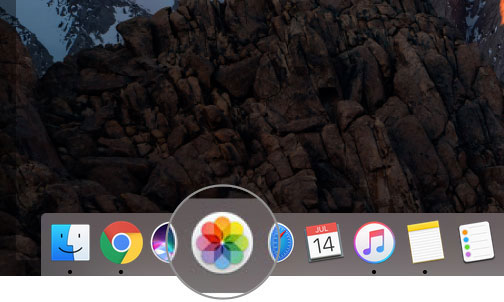
Step #1. Open Photos app on your Mac.


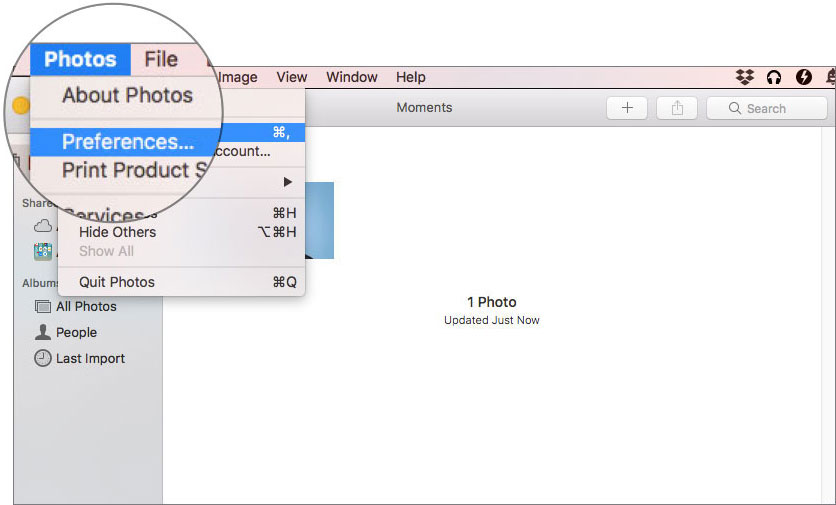
Step #2. Now, select Photos in the left corner and then click on Preferences from the drop-down menu.


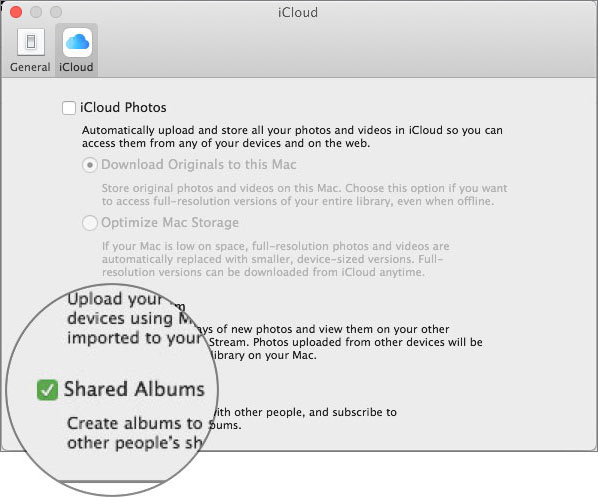
Step #4. Next, click on iCloud tab.


Step #5. Next up, check the box for iCloud Photo Sharing.


Note: In macOS Mojave, you need to tick the box for Shared Albums.


How to Enable iCloud Photo Sharing on your Windows PC


Step #1. Open iCloud app on your computer.


Step #2. Now, click on the Options button next to Photos.


Step #3. Next up, tick the box for iCloud Photo Sharing.


That’s done!


Your take!


I do enjoy blasting some of my coolest clips and shots on social media apps like Facebook and Instagram. However, if I have to share some personal stuff, I always choose to go this way. Let me know what you think of it and whether you would like to give it a go as well.

How to Make MacBook Air/Pro/iMac Run Faster after High Sierra Update 2019 Guide?

How to Speed Up MacBook Pro/Air/iMac after High Sierra Update?

With the uncontrolled hype of the macOS High Sierra update that around its better data management, video streaming, and gameplay graphics, it is little wonder some Macs are slowing down to accommodate such functionalities. Various issues have been linked to slow performances in Macs, such as full hard drive, system aging or the presence of too many applications running simultaneously. Although this Mac becoming sluggish after High Sierra upgrade problem’s specific cause might be unknown, its fixes have been identified and some of our trusted fixes are listed below:

1 Clean Hard Drive on Your MacBook

Unlike the human brain that constantly automatically deletes old and unnecessary data or files, the Mac never deletes a file because it is unnecessary and/or old. File deletion can only be initiated by the user. The flaw of this design is that over time, the limited space hard drive becomes congested and even filled up if nothing is ever deleted. This can be a dangerous scenario for a computer as it hampers performance and could lead to damage, hence frequent decongestion is advised.
Decongestion can be achieved via two methods, either manually or automatically. Manually, a user can go through the rigorous process of searching for and identifying all redundant files and documents on his device and deleting them manually. This is very time and energy consuming but can help in addressing the Mac slowing down after High Sierra update issue.
Automatically, users can opt for tools such as the CleanMyMac 3 tool that automatically identifies redundant files, hidden or not and deletes them, thereby freeing up space on your hard drive for improved Mac functionality and performance.
clean up mac

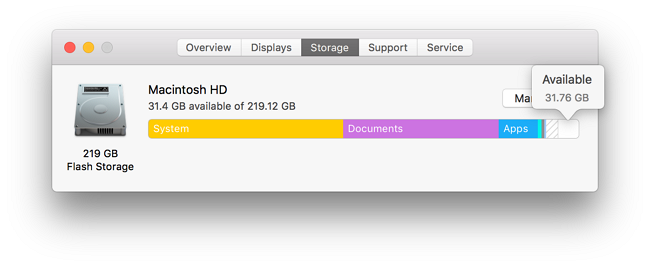
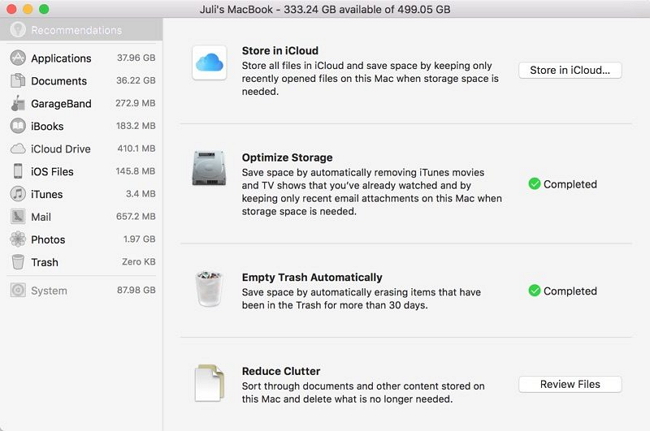
2 Activate the Optimize Storage Option on Your Mac

This Optimize Storage feature is one of the subtle yet amazing features Macs sport that other PC’s have in no wise deployed effectively if at all. Optimized storage is an option that permits mac to arrange and organize files optimally and automatically. To access this setting follow Apple Menu > About this Mac > Storage > Optimized Storage.
Once this option is toggled On, it enforces Mac to automatically organize files and documents while also cleaning unused, hidden or unread items on your device. It moves them to the iCloud, freeing up valuable space on your drive. Before executing this move to the cloud, it requests permission to clear memory, cache, log etc. which should be granted for it to be effective.
optimize storage option on mac

3 Decongest Your Mac Memory and CPU Space

A major reason your Mac might be running slow after its High Sierra update might be that numerous applications are running simultaneously thus consuming vital CPU space thereby slowing down the system. While some applications run actively, others run in the background and also consume considerable space. To recover memory space and resolve this issue, deploy the Activity Monitor.
Access Applications > Utilities > Activity Monitor
Under the CPU tab, you would see the distribution of CPU usage among the currently running processes. Should you identify an application that is not necessary but is consuming considerable memory space, be swift to eliminate it by tapping it and hitting the close button at the top-left corner of the screen. The Memory tab at the top region of the Activity Monitor should be opened to reveal the Memory distribution among the opened apps. Unwanted apps can also be toggled off to save Memory.
speed up cpu on mac

4 Reconfigure SMC & PRAM/NVRAM

The System Management Controller (SMC) and parameter RAM (PRAM) are important tools in ensuring the smooth functioning of the Mac. Reconfiguring the SMC resolves all hardware management issues like fans or battery faults, etc. while reconfiguring the NVRAM handles issues pertaining to booting, screen resolutions and battery charge etc.
SMC on Mac Mini, iMac, Mac Pro & Xserve reconfiguration
  1. Power down your Mac and disconnect the cord
  2. Leave the system for 15 seconds minimum then reconnect the power cord
  3. After a 5 seconds wait, Power up the Mac normally
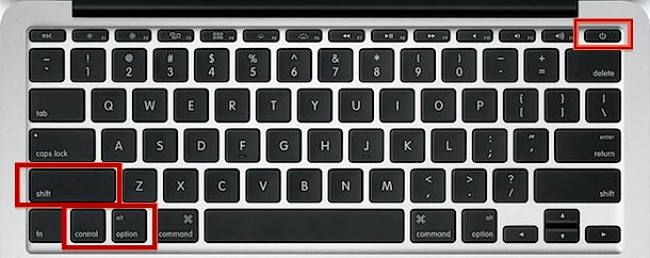
SMC on MacBook Pro, MacBook Air & MacBook reconfiguration
  1. Power down your Mac and disconnect the cord
  2. Leave the system for 15 seconds minimum then reconnect the power cord
  3. Long Press Shift + Option + Control + Power button for 10 seconds minimum, Power up Mac normally after releasing all keys If you accidentally deleted or lost videos on iPhone, first please check on the Recently Deleted folder. Alternatively, you can use the professional tool Gihosoft iPhone Recovery to recover deleted iPhone videos from Camera Roll or some apps.

reset smc macbook air
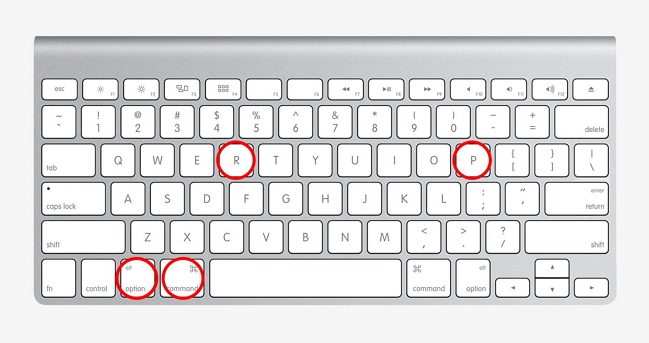
PRAM/NVRAM reconfiguration on all Macs
  1. Power down the Mac, wait for some seconds
  2. Power up and simultaneously press Cmd + P + R + Option
  3. Release keys after hearing the restarting beep
lost iphone messages without backup
The mac running slow after High Sierra update is a widespread problem facing many users using different Mac models, however, the above basic hacks and fixes would help your Mac run smoothly in no time.

Find Out How to Empty Trash on Mac

Manual Ways to Empty Trash on Your Mac Using automatic tool like Umate Mac Cleaner is the most efficient way to empty trash on Mac, howev...